Showing posts with label For Dessert. Show all posts

Thursday, May 29, 2025

PONSA GHARAI - RIPE JACKFRUIT DESSERT

 PONSA GHARAI - RIPE JACKFRUIT DESSERT

A very commonly available fruit in India is the jackfruit which we call Ponas in my mother tongue, Konkani. This is called Hallasinu Hannu in Kannada, Phanas in Marathi and Gujarati, and Chakka in Malayalam.

It is encouraging to know that apart from being so yummy, jackfruits have many health benefits too! 

Elsewhere in this blog, you will find recipes for dishes made with jackfruit such as:-

Today's recipe is for a popular dessert made with jackfruit in our GSB Konkani community called Ponsa Gharai. It is like a payasam, served after a meal. This dessert can be served hot or refrigerated as per your preference. 

Please remember the amount of jaggery you add will depend on the inherent sweetness of the jackfruit you use and your individual taste. The number of jackfruit bulbs used will also depend on their size. In this case, I have used 8-10.

Do let me know if you like this item for dessert.


Ingredients:-

  • Ripe Jackfruit, 8-10 bulbs
  • Fresh Coconut Gratings, 1 cup
  • Jaggery, grated, 1/2  cup heaped 
  • Ghee, 2 tbsp
  • Cashewnuts, broken into halves, 6-8
  • Cardamom Powder, made from 4-5 cardamom pods
  • Rice Flour, 2 tsp 

Method:-

Cut open the jackfruit bulbs, remove the seeds from each of them 
Chop the jackfruit bulbs into small pieces


Heat the grated jaggery in a pan along with 3 tbsp of water until it melts
Strain the jaggery liquid to remove the impurities, if any, and keep aside 

In a mixer, grind the coconut gratings with 1 cup of water. Strain this through a muslin cloth to get the first (thick) extract of the coconut milk . Keep aside.
Put back the ground coconut gratings in the mixer jar, add 1 cup of water and repeat the process to get the second (thin) extract of the coconut milk. 
To this thin coconut milk extract,  add 2 tsp of rice flour and mix well so that it does not form any lumps. This helps thicken the texture of the Gharai. 

Heat the ghee in a thick bottomed pan. Roast the cashew nuts on medium heat till they turn slightly golden. Keep aside. 

In the same pan, add the chopped jackfruit pieces and saute till they are almost cooked
To this, add the melted jaggery syrup, mix and bring to a boil
Now add the thin milk extract, mix well and bring to a boil 
Lower the heat, add the thick milk extract, mix well and once again bring to a boil

Switch off the gas. Mix in the cardamom powder and garnish with roasted cashewnuts.
Transfer the Ponsa Gharai to a serving bowl
Serve hot or refrigerated, as per your preference


Monday, December 18, 2023

EGGLESS CHOCO BUTTERSCOTCH CAKE - GUEST POST BY MANJU G. RAO

 EGGLESS CHOCO BUTTERSCOTCH CAKE - GUEST POST BY MANJU G. RAO

Christmas is fast approaching and cake lovers the world over look forward to enjoying the festive season with cakes of different kinds.

A couple of years ago, we had a Guest Post for Plum Cake ( Christmas Fruit Cake) in this blog by my friend, Manju G. Rao. Manju is an accomplished baker and runs a bakery of her own. She has developed her passion for baking to a home business called "The Cakery by Manju". 

This time we have a guest post for Christmas by Manju where she shares her recipe for her delicious Eggless Choco Butterscotch Cake. I am sure you will enjoy making it to add to the Christmas gaiety for your family and friends!! 

Thanks for this Guest Post, Manju.... and over to you!!!! 


 From : Manju G. Rao, The Bakery By Manju" 

Let me start by wishing all of you - wherever you are in the world- A Very Merry Christmas !!!

I am delighted to present my recipe for Eggless Choco Butterscotch Cake, a melt in the mouth cake, which is liked by kids and elders alike. It's a perfect fusion of chocolate and butterscotch. There are 4 steps in this recipe:- 

  1. Baking a chocolate sponge
  2. Whipping the cream
  3. Making the praline
  4. Preparing the butterscotch sauce
It's a slightly lengthy process- but believe me, it is fully worth it! 

For Chocolate Sponge:-
  • Maida, (All Purpose Flour),  1 and 1/4 cup
  • Cocoa Powder, 1/4 cup
  • Sugar Powder, 1 cup
  • Curd, 1/2 cup
  • Salt, a pinch
  • Baking Powder, 1 tsp
  • Baking Soda, 1/2 tsp
  • Sunflower Oil, 1/2 cup
  • Milk, 1/2 cup 
In a bowl add curd and sugar powder, mix well then add oil and again whisk until the mixture combines well. Next add the dry ingredients ( maida, baking soda and baking powder should be sifted well 2-3 times). Mix gently, add 1/2 cup milk to get a proper ribbon consistency.
Pour this mix into a well greased baking pan and bake for 30 minutes at 160 degrees Celsius temperature. Take 1 and 1/2 cup of non-dairy whipping cream ( any brand like Tropolite or Fiona), beat it well using an electric blender until a stiff peak is formed. Refrigerate until it is time to use it. 

For Butterscotch Praline:-

In a thick bottomed pan, add 1/4 cup sugar, caramelise it in a low flame. When sugar gets caramelised add 1/2 tsp of butter, switch off the gas, add 3 tbsp of cashew bits, mix well and quickly pour into a greased plate. Let it cool, then crush it into small bits using a mortar and pestle. Keep aside. 

For Butterscotch Sauce:-

Take a thick bottomed pan, add 1/4 cup sugar, let it caramelise on slow flame 
When sugar turns brownish, mix it well and add 1 tbsp butter and 1/4 cup whipping cream ( at room temperature) , add 1 tsp butterscotch essence too to enhance the flavour. Mix well and switch off the gas when the sauce turns a little thick

To wet the cake layers take 1 tbsp of butterscotch sauce, add 3 tbsp of water, mix well and keep aside.

Now to assemble the cake:- Cut the cake into 3 layers, place a cake board on the turn table, place the first cake layer, wet the layer fully with 1 tbsp of syrup, spread the whipping cream on the layer, then spread butterscotch sauce and praline on the layer.

Then place the second layer and repeat the process.

After placing the third layer, wet the cake and spread cream fully, and slowly cover the whole cake with cream until you get a decent finishing.

You can decorate the cake with chocolate ganache or butterscotch sauce or both if you wish. 

Tips:-

  • It's always better to use a piping bag to spread the cream. It makes the work easy
  • Be very careful while caramelising the sugar. Keep a proper distance during the process as it gets too hot!
  • For pouring consistency chocolate ganache, take 1/2 cup grated compound chocolate, pour 1/4 cup hot whipping cream and 1/2 tsp butter, mix well and sieve using a strainer. Pour the mild hot ganache on the chilled cake
  • Refrigerate the cake for at least 4-5 hours for it to set properly before serving.
This is what my Eggless Choco Butterscotch Cake looks like!! 


Saturday, January 1, 2022

GUR PAPDI

 GUR PAPDI

Here's wishing you and your families a Healthy, Safe, and Happy New Year. We know how things have been for the last two years ever since the Covid 19 pandemic struck the world. 

It is important that we stay safe. I would urge you to wear a mask, and be responsible in following  prescribed behavior during this medical crisis which seems to go on and on.

Even in difficult times, we have shown great spirit in cooking th best food for our families. In my blog, I share with you dishes that I have made myself which are healthy and tasty.

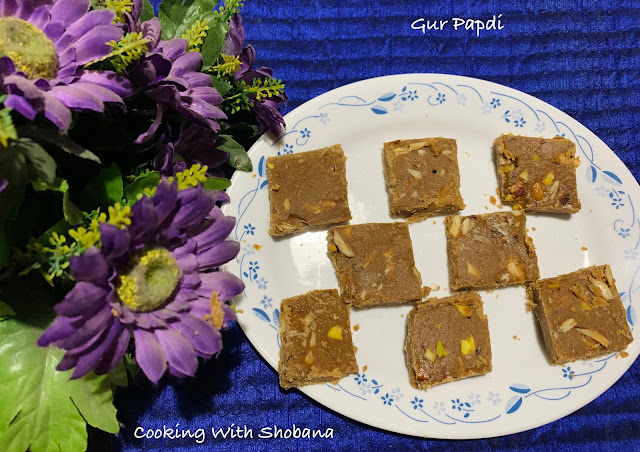
We start the New Year with a sweet. Here's an easy recipe for a sweet from Gujarat called Gur Papdi or Sukhdi. This is made with Gur (Jaggery), Atta and Ghee. 

Give it try and let me know how you liked it! 

May the New Year bring in better times for us. Once again, I wish you a Very Happy New Year. 


Ingredients:-

  • Gur (Jaggery), 3/4 cup
  • Atta, (Wheat Flour), 1 cup
  • Ghee, (Clarified Butter),  1/2 cup
  • Almonds, 8-10 
  • Pistachios, 8-10
  • Cardamom, 7-8
Method:-

Grate the jaggery 
Make slivers of the almonds and chop the pistachios
Crush the cardamom to a powder 
Grease a plate with ghee to spread the Gur Papdi and cut into desired shapes when it is ready 

In a thick-bottomed kadhai, heat the ghee and when it fully melts add the atta
Stir continuously on medium/low flame for about 7-8 minutes or till the atta gets well roasted, turns slightly golden in colour and gives off a good aroma
(Take care that you stir continuously on low flame otherwise the atta will get over roasted which will affect the taste of the Gur Papdi) 
Add the cardamom powder and mix well

Switch off the gas and continue to stir the mixture for a few minutes
Remove the kadhai and let the roasted atta cool a little
It should not cool too much
To this add the grated jaggery and mix thoroughly so that it gets well- blended with the atta and melts due to the heat retained

Spread the Gur Papdi evenly in the greased plate and garnish with almonds and pistachio
For better affect press the almonds and pistachios gently with the back of a spoon into the Gur Papdi
Make cuts of the desired shape in the Gur Papdi while it is still slightly warm
(It becomes difficult to cut once it cools too much) 
Wait for 15-20 minutes, then gently remove the Gur Papdi pieces from the greased plate 
Store the Gur Papdi in air tight glass containers 


Thursday, December 23, 2021

PLUM CAKE ( CHRISTMAS FRUIT CAKE) - GUEST POST BY MANJU G.RAO

PLUM CAKE (CHRISTMAS FRUIT CAKE) GUEST POST BY MANJU G.RAO

The festive season is here and naturally we associate Christmas with cakes and other goodies!

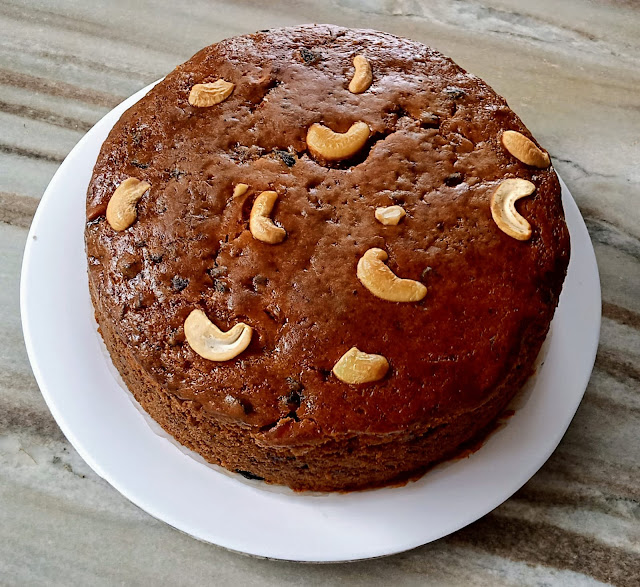
Today, I am delighted to share a Guest Post for Plum Cake ( Christmas Fruit Cake) 🎂 🍰 sent in by my friend, Manju G Rao.

Here's her recipe and picture.  She has started taking orders and delivers within her home town, Kanhangad, in Kerala, India. We wish her all success in her new venture,

This cake looks too yummy! 

For all of you who are celebrating Chritsmas, we wish you a Very Merry Christmas! 


Ingredients:-

  • All Purpose Flour (Maida) ---3/4 cup
  • Eggs               ---2
  • Vanilla Extract- 1 tsp 
  • Sunflower Oil__1/4 cup
  • Sugar Powder-- 1/4cup ( add 4-5 cloves while powdering)
  • Baking Powder--1 tsp 
  • Baking Soda-    --1/2 tsp
  • Salt                    -- a pinch
  • Seedless Black Raisins--1/2 cup
  • Golden Raisins.          ---1/4 cup
  • Tutti Frutti, Cherries, Cashew bits--1/4 cup altogether
  • Orange Peel Candies or Orange Zest--1 tsp 
  • Caramalized Sugar, 1/2 cup
 Procedure:-

To caramelize the sugar:  In a thick bottom pan, heat half cup sugar, when it changes the colour to golden brown, add one cup hot water( this process should be done with care as it's too hot) bring to a boil, then add all the dry fruits mentioned above except cashew bits, cook for 5 minutes until the caramel becomes slightly thick. Keep this for 2 hours until it cools( or can store this in refrigerator and can use whenever needed.)

Take a clean bowl without any water content ,break two eggs in it

Add vanilla essence, and powdered sugar

Beat with a hand beater until fluffy ( 2-3 minutes) or can use a mixie jar for this

Then add oil, mix gently,  add APF (Maida)  little by little, mix softly without any lumps

(Important: Maida should be seieved well with baking powder and baking soda before mixing with egg batter) 

Next add the caramel with dry fruits, mix well, 

Finally add cashew bits, pour into a greased pan and bake for 45-50 minutes at 170 degree.


Sunday, December 12, 2021

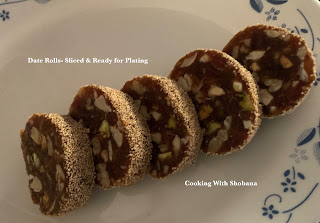
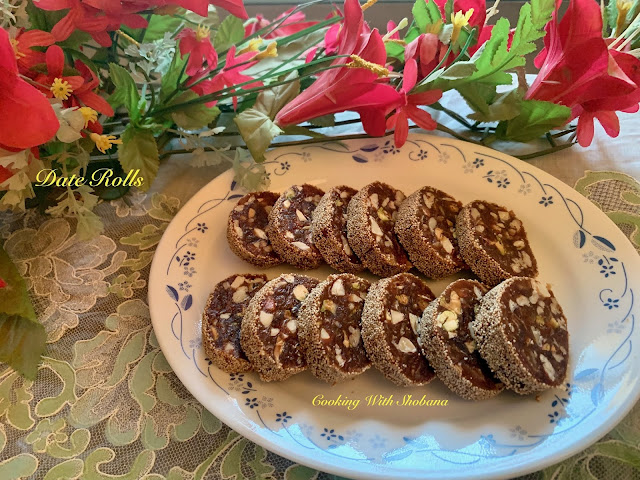
DATE ROLLS

 DATE ROLLS

When we were children growing up in India, good quality dates were not commonly available. Occasionally we would get from friends or relatives coming on visits to the old homeland from the Middle East and feel quite thrilled about it. Now, of course, we are spoilt for choice and there are so many types of dates easily available, including in online sites such as Amazon. 

Dates, called Khajur in Hindi and Kharjura in Kannada, are amongst the most healthy of dry fruits. They have many health benefits as detailed in this article in Health.Com. 

Elsewhere in this blog, you will find other recipes for dishes made with dates such as:-

I have adapted this from the YouTube video for Healthy Sugar Free Date Rolls in Healthy Kadi.

It is preferable that the dates are of good quality and are soft. Use the seedless variety rather than the one that need to be de-seeded. You can use any dry fruits like almonds, cashew nuts, walnuts etc in making this.

We loved this and would highly recommend this recipe to you.

The measurements given yielded me with about 20 date rolls. This is best consumed within two weeks.  


Ingredients:-

  • Seedless Dates, (Khajur),  500 gms
  • Almonds, (Badam) , 1/2 cup
  • Cashew Nuts, (Kaju) 1/4 cup
  • Pistachios, (Pista) 1/4 cup
  • Pecans, a few 
  • Walnuts, a few
  • Poppy Seeds (khus khus) , 4 tbsp
  • Ghee,  2 tbsp

Method:-

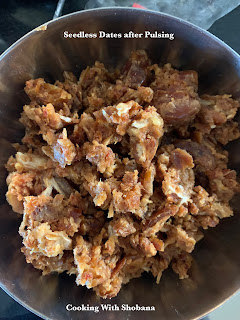
Grind the seedless dates or de-seeded dates in pulse mode in a mixer jar, without adding any water. Keep aside. ( If you are using seedless dates, chop it roughly and keep in the mixer jar. If using dates with seeds, make sure they are properly de-seeded) 

Shell where needed and chop the nuts/dry fruits such as almonds, cashew nuts, pistachio, walnut,  etc. Keep aside. 


Dry roast the poppy seeds in a thick-bottomed kadhai on medium heat for 2-3 minutes. Keep aside

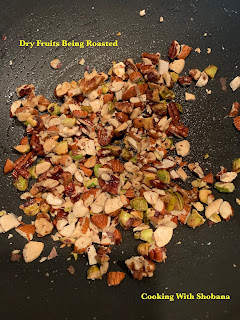
Add 1 tbsp of ghee to the kadhai and on medium heat roast the chopped nuts (almonds, cashews, pistachios, pecans, and walnuts), for about 3-4 minutes till they get roasted and give off a good aroma. Keep aside.


Heat 1 tbsp of ghee in the same kadhai and add the ground dates and sauté them on medium heat for about 3-4 minutes till they become soft
To this add the roasted nuts and mix well till they form a mass


Remove from the kadhai and allow this to cool for about 5 minutes
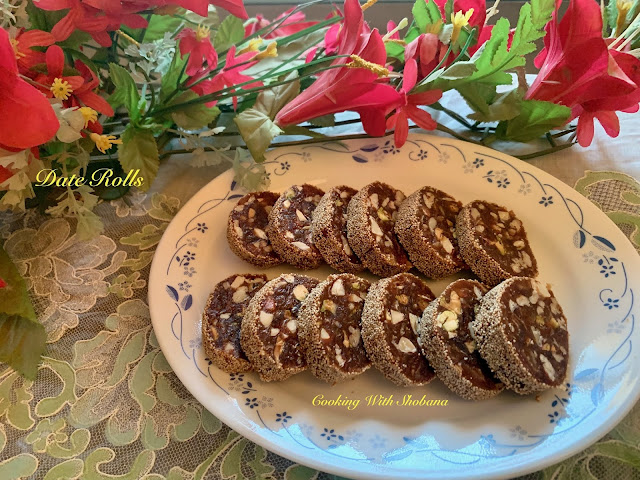
Once it is cool enough to handle, shape it to form a cylindrical roll
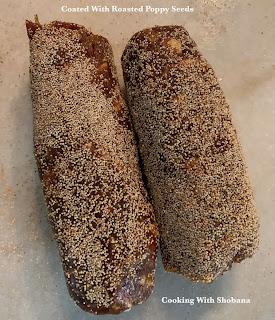
Spread the roasted poppy seeds on to a flat plate and dust these rolls in the poppy seeds till they are well-coated 


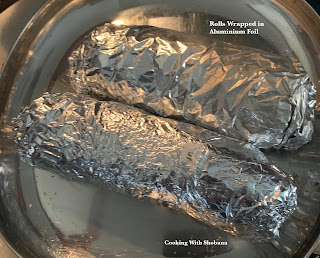
Wrap these poppyseed coated date rolls in aluminum foil and refrigerate for about 2 hours


After about 2 hours, remove the aluminum foil from the rolls and cut them to even slices of about 1/2 inch each 


Transfer to a serving plate or they can be stored in an air tight container. 


Wednesday, November 10, 2021

AKKI HALBAI

 AKKI HALBAI

"Halbai" or halu bai is a popular sweet from the Udupi- Mangalore region of my Home State of Karnataka. Traditionally, it was made for festivals like Nagarpanchami and the like. 

This sweet can be made with Semolina (Rava), Finger Millet (Ragi) or Rice (Akki). Today's recipe is for Akki Halbai or Halbai made using rice. You can use the regular dosa rice or sona masoori rice. Today, I have used Sona Masoori Rice. 

Usually the proportion of rice to water is 1:3 ( that is, 3 cups of water is added to the ground paste made of 1 cup of rice). The measurements given in the recipe yielded about 15 pieces of halbai. 

You can adjust the amount  of jaggery depending upon your taste. The colour of the halbai will depend on the colour of the jaggery used. 

Do try this out. It calls for some effort in stirring continuously but it is well worth the effort when you eat the halbai, especially with some ghee. 


Ingredients:-

  • Sona Masoori Rice, 1 cup
  • Fresh Coconut Gratings, 1 cup
  • Jaggery, grated, 1 cup
  • Water, 3 cups
  • Salt, 2 pinches 
  • Cardamom Powder, made from crushing 4-5 pods of cardamom 
  • Ghee, 2-3  tbsp

Method:-

Wash and soak the rice for 3-4 hours
Drain away the water
Grease a thali with ghee to spread and cut the halbai when ready 

In a mixer jar, grind together the soaked rice along with the fresh coconut gratings, and 1/4 cup of water to a smooth paste
Heat 3 cups water in a thick bottomed kadhai, on medium heat add the grated jaggery and keep stirring till the jaggery gets fully dissolved
To this add the ground paste of rice and coconut, a little salt and stir continuously to ensure that no lumps are formed

When the mixture begins to thicken, add 1 to 2  tbsp of ghee and keep stirring on medium heat
You will find the mixture becomes thick and looks glossy 
Add 1 more tbsp of ghee and keep stirring till the mixture leaves the sides of the kadhai

Add the cardamom powder and mix well
Transfer the halbai to the greased thali and spread it evenly with a spatula or a greased katori
Allow it to cool for about 30 minutes
Lastly, cut the halbai into desired shape
Serve the Akki Halbai with ghee


Monday, August 23, 2021

GULACHA SHEERA

 GULACHA SHEERA

Today's recipe is called Gulacha Sheera and is popular in Maharashtra. Apart from loving the taste of this dessert, I like the fact that we use  jaggery to make it. Jaggery gives the dish adequate sweetness and is a more healthy option than using sugar which is normally used to make sheeras.

Over the last few years, I have consciously tried to use jaggery instead of sugar. This article in The Times of India details the benefits of jaggery over sugar in our diets. 

Elsewhere in this blog, you will find other dishes in which we use jaggery such as:-

I made this recently as neivedhya for Varamahalakshmi festival . Please try out this Gulacha Sheera and I am sure you will enjoy it! 


Ingredients:-

  • Rava/ Semolina, 3/4 cup
  • Jaggery, grated, 1/2 cup, or to taste
  • Warm Water, 1 and 1/2 cups 
  • Ghee, 2 and 1/2 tbsp
  • Cashewnuts, broken into pieces, 1 tbsp
  • Raisins, 1 tbsp
  • Cardamoms 2-3, made into a powder
Method:-

Dissolve the grated jaggery in 1 and 1/2 cups of warm water. Heat if required for it to dissolve completely. Keep aside. 
Peel the cardamoms and crush them to a powder. Keep aside.

Heat a thick bottomed pan and on medium heat add 1/2 tbsp of ghee. Roast the broken cashewnuts till they turn slightly golden. Keep aside
Next add the raisins and fry till they puff up. Keep aside. 

In the same pan, add 1 tbsp of ghee and roast the rava on medium heat stirring constantly till it gives off a good aroma and turns slightly golden in colour

To this add the jaggery water and mix well taking care that there are no lumps
Cook till the rava gets done and the excess water gets absorbed, stirring constantly 
Now add 1 tbsp of ghee, roasted cashewnuts, roasted raisins and cardamom powder and mix well
Continue to stir till the mixture leaves the sides of the pan and forms a ball

Apply some ghee  to the insides of a bowl. Transfer the Gulacha Sheera to this bowl. 
Garnish with raisins or nuts as you wish 


Friday, April 2, 2021

PEANUT SESAME LADOO

 PEANUT SESAME LADOO

Most of us love to eat sweets ! We are ever ready to have one or the other of the many different types of sweets we make in India. A popular Indian sweet made in every Indian home is the Ladoo/Laddu.

Elsewhere in this blog, you will find recipes for different types of Ladoos such as:-

Today's recipe is for a delicious ladoo made with just three ingredients: Peanuts, Sesame Seeds, and Jaggery. 

As you know, peanuts and sesame seeds have numerous health benefits. Peanuts are rich in protein , fat and fibre. Sesame Seeds are rich in nutrients vital to bone health. The third ingredient jaggery is again rich in many minerals and vitamins. It scores over refined sugar in many ways. 

Also, this recipe does not call for the use of ghee. So the good news is that these ladoos- in moderation, of course- are healthy as well being very tasty! 

I have adapted this from Peanut Sesame Ladoo or Palli Nuvvala Laddu by blogger Hari Chandana.

The quantities mentioned of the ingredients yielded me with 10-12 Ladoos. 


Ingredients:-

  • Peanuts, 1 cup
  • Sesame Seeds, (Til), 1/2 cup
  • Jaggery, grated/powdered, 3/4 cup
  • Cardamom, 2 :  Peel and powder / 
Method:-

In a thick-bottomed pan, dry roast the peanuts on medium flame for about 6-8 minutes stirring continuously till they crackle and they become brown in colour 
Remove from the pan and allow it to cool then remove the skin of the peanuts by rubbing them between your palms. Keep aside
In the same pan, dry roast the sesame seeds on medium heat stirring continuously till they turn golden in colour and start popping. Keep aside and allow it to cool.
In a mixer jar, grind together the roasted peanuts and the roasted sesame seeds, in pulse mode, to a coarse powder
To this add the grated/ powdered jaggery and pulse it again so that the jaggery gets well blended with the peanuts-sesame powder 
Transfer the contents to a plate, break up lumps if any and mix in the cardamom powder
Take small portions of this mixture and shape them into ladoos using your fingers and palms 
Store the Peanut Sesame Ladoos in air tight container

* Tips : Running the mixer in normal mode will result in the sesame seeds and peanuts releasing too much oil, hence we should use the pulse mode with frequent intervals 


Sunday, March 21, 2021

NENDRA PAZHAM PRADHAMAN

 NENDRA PAZHAM PRADHAMAN

I am delighted to share with you that today, March 21, 2021 happens to be the 8th anniversary of my blog. I would like to thank you my family, friends and followers of this blog, for your continued encouragement and support for "Cooking With Shobana" since I started this in 2013.  

The blog allows me to follow my passion for cooking. To learn new dishes and share them through this medium. By God's grace, my blog has received over 3.21 million hits so far and has over 18900 followers on Facebook. 

When my husband encouraged me to start this blog in 2013, I never imagined it would reach this level of featuring in The Best Food Blogs of India from the reputed Indian Bloggers website. I am grateful to Shri Ganesha for his blessing. 

Today's recipe called Nendra Parzham Pradhaman is for a dessert made with ripe Nendra Pazham, a speciality banana of Kerala. Pradhaman is a popular dessert made for festivals in Kerala though it involves a lot of work! Usually, coconut milk (both thick and medium/thin) is first extracted to make this dish. These days this is available in Tetrapacks too! The amount of jaggery added will depend upon the sweetness of the ripe bananas used, and of course, your individual taste. The colour of the Pradhaman will vary with the amount and color of the jaggery used. I have added cardamom powder for flavour but have not added dry ginger powder. 

 I have adapted this from Nendra Pazham Pradhaman in Radhika's Tickling Palates website.

We enjoyed this very much and hope you will- too! 


Ingredients:-


  • Nendra Pazham ( Ripe Bananas) , 2
  • Thick Coconut Milk, (first extract), 1 cup
  • Medium Coconut Milk, (next extract),  1 and 1/2 cups
  • Jaggery, grated, 3/4 to 1 cup
  • Ghee, 4 tbsp
  • Cashewnuts, 8-10, 
  • Coconut Slivers, 2 tbsp
  • Cardmom Powder, 1/2  tsp
Preparatory Work:-

Wash the Nendra Pazham and snip off the ends. Cut them into 2-3 pieces depending upon the size of the bananas. Place the cut banana pieces in a steamer and steam them for about 10 minutes or till they fully done. Allow them to cool and peel off the skin. 
Grind them to a pulp in a mixer jar without adding any water. 

Cut a piece of the coconut and cut into slivers. Keep aside. 
Break the cashewnuts into halves. Keep aside. 

Extract the coconut milk, first thick and then thin and keep aside. ** Process for extracting coconut milk given below 

Heat the grated jaggery in a pan on medium flame adding 2 tbsp of water. Mix till the jaggery dissolves fully. Switch off the flame and strain the jaggery syrup through a strainer and keep aside. 

Method :- 

Heat a thick bottomed pan and add 3 tbsp of ghee. Once it melts add the cooked Nendra Pazham pulp and mix well. Cook for about 5 minutes stirring continuously on medium/low flame. 


To this add the prepared jaggery syrup, mix well and cook for 2-3 minutes 
Now add the second or medium/thin coconut milk, mix and cook for 8-10 minutes, stirring continuously  till the mixture thickens- take care to see that it doesn't get burnt at the bottom 
Next add the first or thick coconut milk and mix well 
Cook the pradhaman for 2 minutes on low flame then switch off the gas
(Please note that at this stage you should not cook on high heat or for too long as the thick extract could curdle) 

In a small pan heat 1 tbsp of ghee
On medium heat add the broken cashew nuts and roast them till they turn golden in colour. Keep aside
In the same pan, add the coconut slivers and sauté till they turn golden brown. Keep aside. 

Finally, add the roasted cashewnuts and coconut slivers to the pradhaman along with the cardamom powder and mix well 
Keep the pradhaman covered for  a few minutes
The Nendra Pazham Pradhaman can be served hot immediately or served later after it is chilled as per your choice.

** Extracting The Coconut Milk: 
Take a medium-sized coconut. Break it and keep the coconut water aside. Scrape the coconut gratings and grind them well in a mixer jar with 1 cup of water. Next, filter this coconut pulp through a sieve or through a muslin cloth. This gives you the first or thick coconut milk extract.

Place back the coconut gratings pulp  in the mixer, add 1 and 1/2 cups of water and grind once again. Repeat the filtering process to get the second/medium/thin coconut milk extract. 


Saturday, January 16, 2021

PEANUT CHIKKI

PEANUT CHIKKI

The festival of Makar Sankranti which we celebrated a few days ago brings to the fore, one of my favourites: Chikki. Mention of chikki brings back many memories of our days in Pune when trips to Lonavla near by were not complete without buying all kinds of chikkis.

It is nice that I can make these at home myself these days. I made Peanut Chikki for the Makar Sankranti festival and we enjoyed it very much.

I must mention that there is some skill involved in making this. The judgement regarding the hardness or otherwise of the jaggery syrup is crucial for the making of the perfect chikki. Don't be disappointed if you can't get it right the first time. Try again and when you get it right, you will think the time and effort was well worth it! 

It is preferable that we use the special chikki jaggery to make this. This will give you the best texture and the desired glossy finish to the chikki.  However, if you cannot get this, you can certainly make do with soft jaggery. Please note that the colour of the jaggery used will determine the colour of the chikki.    

I used the greased marble "chakla" ( the circular base on which chapatis are rolled) to lay out and cut the chikki pieces. 


Ingredients:-

  • Peanuts, 150 grams
  • Jaggery, 150 grams
  • Water, 2 tsp
  • Ghee, 1 tsp + some for greasing
Preparatory steps:-

These steps are essential as this work cannot be done once the chikki mixture is ready. They must be done before doing anything else! 
  • Grease the reverse a large sized thali or a small portion of the kitchen counter or a marble or wooden chakla with a little ghee 
  • Grease a thick rolling pin
  • Grease one side of a sheet of parchment paper or butter paper 
  • Break the jaggery into small pieces so that it can melt easily. 
  • Keep a small bowl of water to test the jaggery syrup 

Method:-

In a thick bottomed, wide non-stick pan dry roast the peanuts on medium heat till spots appear on them and they get roasted 
Ensure that they don't get burnt
Transfer to a large plate and allow the roasted peanuts to cool
Once they are cool, de-skin them and separate the roasted peanuts from the skin 
Using a steel bowl lightly crush the peanuts to break some of them into smaller pieces. Keep aside 

Heat the same pan, and add the jaggery pieces and 2 tsp of water and keep stirring on low heat till the jaggery melts 
Continue to cook on low flame for about 5 minutes 

Test whether the jaggery syrup is ready by dropping a few drops of the syrup in the water
If it is not yet done, it will remain soft and gooey
In this case, stir the melted jaggery on low heat a little longer  and repeat this test
When done, the drops of syrup should form a hard ball and should be brittle when dropped in water 

Once the jaggery syrup is ready, add the roasted peanuts and mix well immediately and switch off the gas
Pour the chikki mixture on to the greased surface 
Cover it with the parchment paper with the greased side on the chikki and spread it fast using the rolling pin ( belan) 
The extent you spread it will determine the thickness and uniformity of the chikki
Peel off the parchment paper
While it is still hot make the horizontal and vertical cuts on the chikki as this cannot be done once it cools 
Allow it cool completely, remove the pre-cut chikki pieces
Transfer the Peanut Chikki to an air tight container 


Friday, January 1, 2021

EGGLESS CHOCOLATE MUG CAKE

 EGGLESS CHOCOLATE MUG CAKE 

Here's wishing you and your families a Very Happy New Year! 

We can't forget the havoc caused in 2020 by the ongoing Covid 19 pandemic! The experts say that despite the vaccinations that will hold everyone's attention all through 2021, it is wise for us to remain safe. 

For the sake of your families, please continue to follow measures such as hand hygiene, social distancing and the wearing of masks! 

To bring cheer to the New Year, I made this Eggless Chocolate Mug Cake. 

Tips:- 

First and foremost, and this is critical, use a microwave-safe mug. 

Second, take a mug of the right size otherwise the cake will simply overflow in the microwave. 

Third, you can adjust the levels of sweetness to suit your individual taste. 

We had the Eggless Chocolate Mug Cake just as it was but you can add vanilla ice cream to it, if you wish! We enjoyed this as I am sure you will too! 


Ingredients:-

  • All Purpose Flour ( Maida),  3 tbsp
  • Baking Powder, 1/4 tsp
  • Sugar, 3 tbsp
  • Cocoa Powder, 2 tbsp
  • Salt, a pinch
  • Melted Butter, 3 tbsp
  • Milk, 3 tbsp - at room temperature 
  • Vanilla Essence, 1/4 tsp 
  • Chocolate Chips, 1 tbsp
  • Walnut, broken into pieces, 1 tbsp 

Method:-

In a large mug of about 12 ounces or 355 ml capacity, add one by one, the maida, baking powder, sugar, cocoa powder, and salt, 
Using a fork mix this together
Next add, one by one, the melted butter, milk, vanilla essence, chocolate chips and the walnut pieces.
Mix well together once again to get a smooth batter

Place the mug in the microwave oven and microwave it for 1 minutes 20 seconds on High mode 

Pierce the cake with a toothpick and if it comes out clean that means it is done! 

Serve the Chocolate Mug Cake warm as it is or with vanilla ice cream 


Thursday, January 16, 2020

PASI PARUPPU PAYASAM

PASI PARUPPU PAYASAM

Happy New Year, dear readers! I am back after a break of about six weeks. Yesterday was an auspicious day for us in india. We celebrated the festival of Pongal/Sankranti. Yesterday, is also significant as being the start of the harvesting season.

Like in every Hindu home where Makar Sankranti/Pongal is celebrated, I made a sweet too. This one is from Tamilnadu and is called Pasi Paruppu Payasam. It gets it's name from "Pasi Paruppu" being the name for Moong Dal ( yellow lentils) in English. "Payasam" is a sweet dish somewhat like "kheer" made in North India.


Ingredients:-
  • Pasi Paruppu or Moong Dal, 1/2 cup
  • Jaggery, grated, 3/4 cup, or to taste 
  • Thin Coconut Milk, 1/2 cup
  • Thick Coconut Milk, 1 cup
  • Ghee, 1 and 1/2 tbsp to 2 tbsp
  • Cashewnuts, 10-12, broken into halves
  • Raisins, 1 tbsp
  • Cardamom Powder, 1/2 tsp 

Method:-

First, we will extract the coconut milk if you are making it from scratch
Grate 1 full medium-sized coconut
In a mixer, grind the coconut gratings along with a cup of water for a few minutes at high speed
Filter the ground mixture using a damp muslin cloth or a strainer and press the mixture till all the coconut milk is collected . This is the thick coconut milk. Keep aside.
Next, return the coconut pulp to the mixer and blend again with another cup of water and repeat the straining process to extract the thin coconut milk. Keep aside.
The pulp that remains can be discarded,

Obviously, the above steps are not required if you are using store bought canned Coconut Milk

Dry roast the moong dal till it becomes slightly golden in color and gives off a good aroma
Rinse the roasted moong dal and place it in a vessel and add to it 1 and 1/2 cups of water
Pressure cook the moong dal in the vessel for about 3-4 whistles or till it gets fully cooked
Once the pressure cooker cools, transfer the cooked moong dal to a pan and and mash it with the back of a ladle
Heat the pan and to this add 1/2 cup of thin coconut milk that you have prepared, grated jaggery and cardamom powder
Mix well and stir continuously on medium heat till the jaggery gets fully dissolved and well blended with the cooked moong dal and bring to a boil 
Now add the thick coconut milk, mix well and let it simmer on low flame for 1-2 minutes
(Do not overheat after adding the thick coconut milk as this could curdle)
Switch off the gas and keep the payasam aside
Heat the ghee in a tempering pan and on medium heat add the cashew nuts, broken into halves, and fry them till they become golden in color
Add the raisins and fry till the raisins swell up 
Lastly, add the roasted cashew nuts, raisins to the Pasi Paruppu Payasam  and serve it hot


Thursday, March 21, 2019

INSTANT MOONG DAL HALWA

INSTANT MOONG DAL HALWA

There are some dates that stay firmly planted in your memory. March 21 is one such for me! I am so pleased to share that this blog completes 6 years today. It was on March 21, 2013 that I posted my first dish.

It is with quiet satisfaction that I see that since then there have been 677 posts which have received over 2.5 million hits. The Facebook Page for Cooking With Shobana has over 16,000 likes and the blog continues to feature in the Top 100 Indian Food Blogs and Websites.

I am grateful to God, and to you, my family and friends for your encouragement and support over the years.

To celebrate the occasion, today I have made a sweet dish called Moong Dal Halwa, which is popular all over India. This is the Instant version which is easier to make. It has been adapted from Instant Moong Dal Halwa by one of my favourite cookery experts, Nisha Madhulikaji.


Ingredients:-
  • Moong Dal, (Yellow Split Gram), 1 cup
  • Sugar, 1 heaped cup 
  • Ghee, 1/2 cup, 
  • Full Cream Milk, 1/2 litre + additional 1 cup (optional-instead of water) 
  • Cashews, chopped, 10-15
  • Almonds, finely chopped, 10-15
  • Raisins, 1 tbsp
  • Pistachios, 10-15
  • Powdered Green Cardamom, from 6-7 pods

Method:-

Heat a little ghee in a pan and add the cashewnuts, almonds, and raisins. Roast them for a few minutes and keep aside.
Peel and powder the Green Cardamom and keep aside
Clean the moong dal, removing the powder if any
In a thick-bottomed pan, dry roast the moong dal for about 5 minutes on medium flame stirring continuously till it gives off a good aroma and turns a golden brown
Ensure that the moong dal doesn't get burnt
Transfer to a plate and allow the roasted moong dal to cool
In a mixer jar, grind the roasted moong dal in pulse mode to a coarse powder. Keep aside
Heat 4 tbsp of ghee in the pan and on medium heat roast the coarsely ground moong dal for about 5 minutes till it gives off a good aroma and turns a golden brown
Lower the flame and add 500 ml milk and keep stirring so that no lumps are formed
Add another 1 cup of milk (or water) and cook on medium flame stirring continuously till it forms a thick mass
Next add the sugar and some of the roasted dry fruits (keeping aside some for garnish) and cook for some more time as the sugar added leaves water
Add the remaining ghee and keep stirring till it gets well blended and more thick
Add the powdered cardamom and cook the halwa for 1-2 minutes more
Transfer to a plate and garnish with the remaining roasted dry fruits and pistachios


Friday, January 26, 2018

APPLE KHEER

APPLE KHEER

Recently I got some excellent apples in the department store we usually shop in. You may recall the old saying, " an apple a day keeps the doctor away!" as apples have ever so many health benefits. I was surprised to know from this article in Organic Facts that there are 7500 varieties of apples!!

I made kheer out of the apples. In this recipe the apples are not peeled and we use them with the skin intact. The amount of sugar you use will depend on the sweetness of the apples and your taste.

This recipe is adapted from this YouTube video of Apple Kheer by Master Chef Sanjeev Kapoor's Khana Kazhana which is so nicely presented by Anupa in Marathi.


Ingredients:


  • Apples, 2
  • Full Fat Milk, 5 cups or 1 litre
  • Sugar, 1/2 cup or taste
  • Cardamom (Elaichi) Powder, 1/2 tsp
  • Almonds, 6
  • Pistachios, 8

Method:

In a thick bottomed pan, bring the milk to a boil then lower the flame and simmer till the milk becomes thick and is reduced in volume
Blanch and slice the almonds and pistachios and keep aside. For blanching, keep the almonds and pistachios in warm water and then remove the skin.
Wash and grate the apples roughly without peeling the skin
In a separate pan, cook the grated apples on medium flame
Add sugar and cook stirring continuously till the sugar melts and the moisture evaporates
(This prevents the milk from curdling in the next step when we add the cooked apples)
To this add some of the reduced milk and cook on medium flame
As the mixture thickens, add the remaining milk and cook till the kheer becomes more thick
Add cardamom powder and the blanched and sliced almonds and pistachios
Mix well, reduce the heat and let it simmer for about 10- 15 minutes
Once it is cooled, refrigerate the kheer and serve chilled.


Monday, January 1, 2018

BEETROOT HALWA

BEETROOT HALWA

It is traditional to start the New Year on a sweet note. Today I share the recipe for Beetroot Halwa
which turned out to be rich, creamy and quite delicious. As you know, beetroot has numerous health benefits.

The addition of sweetened condensed milk enhances the taste of the halwa. However this is not essential and you can add more sugar instead if you don't want to use sweetened condensed milk.

Beetroot itself has an inherent sweetness. Do consider this when you add sugar or condensed milk.


Ingredients:
  • Beetroot, 500 gms
  • Full Cream Milk, 1/2 litre
  • Amul Mithai Mate Sweetened Condensed Milk, 2 heaped tbsp or nearly 1/4 cup
  • Sugar, 1/2 cup
  • Raisins, 1 tbsp
  • Cashewnuts, 8-10, broken into pieces
  • Elaichi (Cardamom) Powder, made from 5 cardamoms
  • Pista or Almond, a few slivers for garnishing
  • Ghee, 2 tbsp + 1-2 tsp for roasting cashewnuts & raisins

Method:

Wash the beetroots thoroughly and grate them using a grater. Use the larger grating slots and do not grate them too fine.
In a thick-bottomed wide kadhai, add 1-2 tsp of ghee and when it gets hot roast the cashewnut pieces and the raisins till the cashewnuts turn golden, and the raisins get bloated. Keep aside.
Add 2 tbsp of ghee and when it gets hot add the grated beetroot and saute on medium flame for about 7-8 minutes or till the raw smell goes, stirring continuously
To this add the full cream milk, and the condensed milk. Mix well and continue to cook on medium flame stirring from time to time till the milk reduces to about a quarter.
Now add the sugar and mix well. The sugar added will change the consistency of the halwa and make it more liquid.
Continue to cook uncovered till the milk evaporates and the halwa leaves the sides
Add and mix in the roasted cashewnuts and raisins. Add the cardamom powder and mix well. Garnish with pista or almond slivers
Remove from flame and transfer to serving bowl.
Serve hot, or refrigerate and serve cold as per choice


Wednesday, May 24, 2017

AMRAKHAND

AMRAKHAND

While mangoes are available in most parts of the country, Maharashtra has a special reputation for producing some of the choicest mangoes. In this State, Shrikhand is a popular dish which is served with puris or even eaten as such.When Shrikhand is made using mangoes it is called Amrakhand.

The secret to making a good amrakhand is the quality of the hung curds and the sweetness of the mangoes you use. The amount of sugar required will depend on the sweetness of the mangoes used as also your taste.

Usually, I make this in small quantities. I use 400 grams of store bought set curds from which I obtain 150 grams of hung curds. This is nothing but yogurt drained of all the liquid or whey leaving behind a thick mass of curds which is called Chakka.

It is advisable to use the better quality of mangoes like Alphonso for the sweetness, colour and their not being fibrous.

We love to have Amrakhand as a dessert and it tastes just great!


Ingredients: 
  • Mango Puree, 1/2 cup
  • Hung Curds (Chakka ), 150 gms
  • Saffron, a few strands
  • Warm Milk, 1 tbsp
  • Powdered Sugar, 1/4 cup, or to taste 
  • Cardamom (Elaichi) Powder, 1/2 tsp
  • Almonds ( Badam)  Slivers, 1 tbsp, for garnish
  • Pistachio Slivers, 1 tbsp, for garnish
Method:

Place a colander or sieve lined with muslin cloth on top of a vessel and pour the curds ( about 400 gms) in the muslin cloth so that the distilled curds remains on top and the whey drips into the vessel.
Wait till all the whey drains out into the vessel leaving a thick mass of curds in the muslin cloth.
Press the muslin cloth till the liquid whey drains out completely


With 400 gms of set curds you should get about 150 grams of hung curds
Keep the hung curds aside


Combine the saffron with the warm milk in a small bowl and keep aside
In a bowl, whisk the hung curds
To this, add the mango puree, powdered sugar,  cardamom powder and the mixture of saffron and milk,
Whisk till it gets well blended and refrigerate for a few hours
Lastly, garnish with almond and pistachios
Serve chilled


Thursday, May 11, 2017

MANGO MASTANI

MANGO MASTANI

Summer time is mango time! We are so fortunate in India to get such a wide variety of mangoes which we use to make many different drinks and desserts. Elsewhere in this blog, you will find recipes for Mango & Sago Pudding,  Mango Phirni, and Aam ka Lassi.

In the heat of the summer another dessert made with mangoes which is most welcome has the interesting name of "Mango Mastani." It is particularly popular in Pune and is a rich mango milkshake topped with vanilla ice cream.

For best results, choose sweet mangoes of the better variety. The amount of sugar to be added will naturally depend on the sweetness of the mangoes used, and your taste.

This is the way I make it!


Ingredients:
  • Large-sized Alphonso Mangoes, 2 
  • Cold Milk, 3/4 cup
  • Fresh Cream, 1/4 cup
  • Powdered Sugar, 2 tbsp, or to taste
  • Vanilla Ice Cream, 4 scoops
  • Pistachios, chopped, a few
  • Almonds, chopped, a few
  • Glazed Cherries, for garnish

Method:

Wash and peel the mangoes, de-seed and chop them (Keep aside a few chopped mango pieces for garnish, needed later along with the glazed cherries)
Place the chopped mango pieces in the blender
To this, add the powdered sugar, cold milk and fresh cream and blend till you get a thick smooth puree
Pour this milkshake into tall glasses leaving space for the vanilla ice cream scoops to follow
Top up the milkshake with the vanilla ice cream scoops in each of the glasses
Garnish with a few pieces of mangoes, chopped pistachios and almonds and glazed cherries
Serve chilled

* As another option, in the tall glass you can have a layer of mango pieces to start with, then add a scoop of ice cream followed by the milkshake and top it off with another scoop of ice cream, garnished with nuts and the glazed cherry.


Tuesday, March 21, 2017

BADAM HALWA

BADAM HALWA

When I was a child one of my favourite Indian sweets was Badam Halwa, so rich and sweet, made with almonds which were not so commonly available then. We didn't have this frequently but relished it whenever we had this as a treat! There are many ways to make Badam Halwa. While almonds, ghee and sugar are constants, some use milk, others use condensed milk, and some use neither to make this sweet.

Remembering those days, I have made this today to celebrate the 4th anniversary of my blog, "Cooking With Shobana." Here's the link to the Facebook Page where you get links to all the blog posts.

By the grace of God, and the encouragement of my family, friends and well-wishers, this blog continues to grow year after year. It has today over 1,000,000 page views. My sincere thanks to all of you!


Ingredients:
  •  Badam ( Almonds), 1/2 cup * I used California almonds
  • Ghee, (Clarified Butter), 1/3 cup * I used home made ghee
  • Sugar, 1/2 cup, or to taste
  • Kesar (Saffron) , 8-10 strands
  • Warm Milk, 1-2 tsp * to soak the saffron strands
  • Cardamom Powder,  1/2 tsp (optional) 
  • Pista, a few pieces, for garnish
Method:

The first step is to blanch the almonds which means to remove the outer skin. Soak the almonds in boiling hot water and keep them for half an hour or so. You can also microwave them to blanch them faster. Once they are blanched, drain away the excess water and remove the outer skin of the almonds. 

Take 1-2 tsp of warm milk in a bowl and drop the saffron strands in them and keep them soaked for about 15 minutes.

In a mixer jar, grind together the blanched almonds along with 1/3 cup of water to get a paste of rava/ sooji consistency. Make sure the paste does not become too fine. To get the right consistency, do not add all the water at one time. Grind the almonds, using the pulse mode in the mixer, adding water little by little.

Heat a thick-bottomed kadhai and when it gets hot, on medium/low flame add the almond paste. Keep stirring continuously on low flame and cook the almond paste.  After a few minutes when the almonds give off an aroma, add 1/2 cup of sugar and keep stirring on low flame till the sugar gets fully dissolved in the almond paste.

Keep stirring till the paste begins to thicken, cook uncovered on low flame for another 5-6 minutes. Now add the prepared saffron soaked in warm milk and mix it in completely to the almond paste.
We now begin to add the ghee in small quantities. Initially, add 2 tbsp of ghee, mix well and cook stirring continuously till the ghee is fully absorbed.

Then add another 2 tbsp of ghee and continue the same process till all the ghee has been used up.
By now the almond paste and ghee is well blended and thickens to form a halwa.
Continue to stir till the halwa leaves the sides of the kadhai.
Add the cardamom powder, if you are using this at this stage and mix it well.
Once you get the desired consistency, switch off the gas and transfer the halwa to a serving bowl or alternatively grease a plate and transfer the halwa. You can then spread the halwa and when it cools, cut the halwa into the desired shape.
Garnish the badam halwa with slivers of almonds or with pistas.
Your badam halwa is ready to be served.